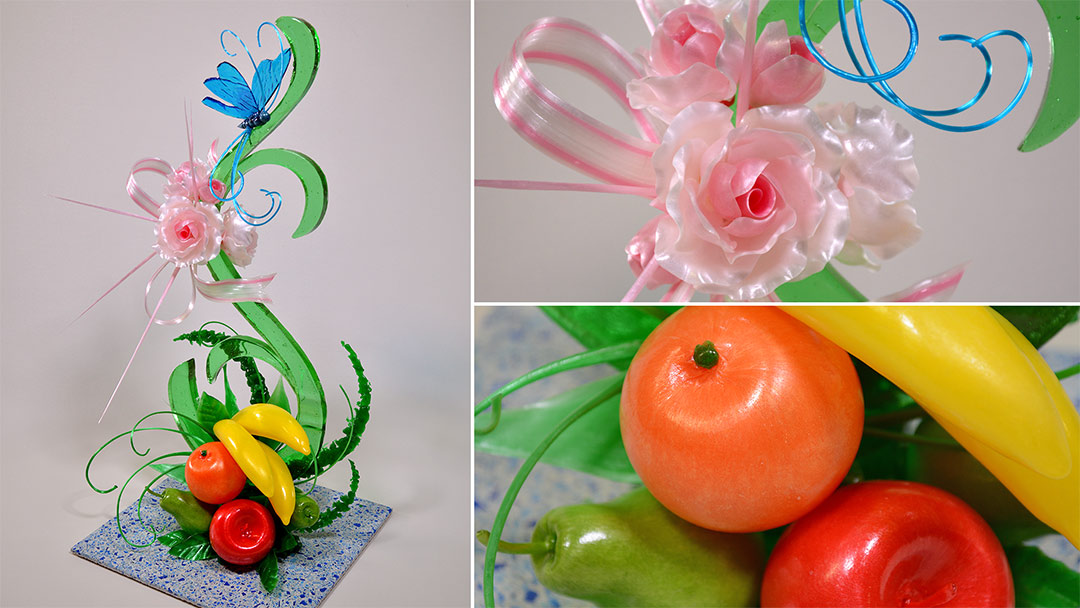
Vine Structured Isomalt Centerpiece

Vine Structured Isomalt Centerpiece

10,916 views

In this tutorial you will learn how to create an Isomalt centerpiece using a solid Isomalt vine structure.

In this tutorial you will learn how to create an Isomalt centerpiece using a solid Isomalt vine structure for it’s main support in order to make your centerpiece achieve a substantial height. You will also learn how to make Isomalt roses, fruits, and decorations. If you’ve never worked with Isomalt before, we recommend watching our Introduction to Isomalt tutorial first. Serdar still uses some classic components but combines them into a modern composition and at the same time, introduces a few new techniques which he has not shown you in previous tutorials.


What you will learn…

  • Blowing Isomalt fruits
  • Pulling Isomalt ribbons
  • Making Isomalt roses
  • Casting high vine structure
  • Simple method of making butterflies

Downloadable Course Material

If you would like to approximately match the size of the artwork in the tutorial, print the downloadable files at 100% size. If you require your artwork to be smaller or larger, just adjust the print size accordingly.
Vine Structured Isomalt Centerpiece Course Material
This PDF document contains an actual size blueprint of the centerpiece.

Track
Duration
Part 1
1:50:31
Introduction
4:59
The Plan
7:41
Preparations for Cooking Isomalt
5:33
Preparations for Components
4:21
Preparations for Structure
4:55
Cooking the Isomalt
11:42
Blowing the Fruit
26:59
Making the Rose
13:05
Making the Ribbon
15:08
Making the Butterfly
15:19
Part 2
1:57:22
Putting the Rose Together
6:29
Making the Cast
16:51
Filling the Cast & Making the Leaves
23:00
Making Smashed Isomalt Branches
9:50
Finalizing the Base
8:37
Assembling the Centrepiece - Part 1
15:31
Assembling the Centrepiece - Part 2
5:27
Adding the Ribbon & Roses
13:06
Adding the Butterfly
7:30
Adding the Spikes and Leaves
6:54
Final Thoughts
1:49
Total Duration
3:47:33

While not everything on this list is absolutely required, these are the things used in this tutorial video. Of course you are welcome to find alternative ways of doing things and we would love to hear if you've discovered an easier method or better tool to achieve good results. Please note that some items may be listed as sets, and it is usually recommended to have full sets, it may not be neccessary. In most cases, only one item from a set is actually used in the tutorial. Please watch the tutorial before purchasing any items to make sure you are not buying anything you don't need.
Tools & Materials
Long Ruler
Ceramic tile
For base
Vinyl sheet
1mm thick 62x32cm and 8x50 cm

For casting base

Wooden board
9mm MDF 62x32cm

This board will be used as tray for casting.

PVC Pipe
Often used to create pillars between cake tiers. Can also be used within the cake to provide extra internal support. Serdar often uses a PVC pipe to roll fondant.
Aluminium Foil
Thicker is preferred.
Water Spray Bottle
Box Cutter
Skewers
Set of Knives
Transparent Pusher
Cellophane
18x18 cm square pieces
Hard sponge ped

To push lines on leaves

Baking Paper
Threaded Rod (10mm)
20 cm long
Threaded rod with 10mm diametre (also known as M10).
Confectioners Varnish
Spray can
Recipes & Ingredients
Isomalt
4kg
Isomalt is a sugar substitute, a type of sugar alcohol, used primarily for its sugar-like physical properties. It has only a small impact on blood sugar…
Gum paste
1.2kg
Cream of Tartar
Cream of tartar, also known as potassium bitartrate or potassium hydrogen tartrate, is a byproduct of winemaking. It is known as cream of tartar in context…

Gel colours
Pure alcohol
Rose spirit

No reviews yet.

Watched this tutorial? Write a Review
Your rating
Add photos (up to 3)

Drag and drop your photos, or

    4 comments

    1. danielle kattan says:

      Loved it! Will try to make it:)

    2. Sruthi Sreedhar says:

      Pleass tell me Which confectionary glaze are you using ??

      1. Serdar Yener says:

        Dinkydoodle, but any other can spray of confectionary glaze will do a similar job. Thanks

    Leave a Reply

    Member's Projects

    Here's what some of our members have created after watching this tutorial.

    No member projects yet. Be the first to share your cake!
    Tried this tutorial at home? Why not show our community by posting it in our Facebook community of 12k+ members!

    Buy This Tutorial
    Individually
    Watch Anytime,
    from Anywhere
    Instant 24/7 Access
    that Never Expires
    Downloadable
    Course Material
    7 Day 100% Money
    Back Guarantee!
    $39.99
    Add to Cart
    Price is in AUD
    ---- OR ----
    Subscribe to get instant access
    to ALL Tutorials

    or

    Members can own this tutorial with 400 credits.

    Log in Learn more